Experiment 04
In the final post of the series I give a practical example of how to incorporate continuously reproducible strategies into your workflow.
Introduction
In the first post in this series I described the characteristics of reproducible code. In the second post I described the foundational tools that I use in my approach to creating continuously reproducible code. This final post incorporates the approach into an existing repository.
Example
I selected FsHttp as a demonstration codebase. FsHttp follows many recommendations of the continuously reproducible mindset (i.e. LTS releases, pinned dependencies), but it lacks continuous integration. I will show two different ways to adopt it.
Approach #1 (.NET variant)
The preferred way for .NET projects is to use .NET directly to verify the build. I forked the FsHttp repo and removed some parts that were unnecessary to this blog post. You can find that fork here.
Since the repository is already on Github I will use Github Actions to implement continuous integration. If you use another continuous integration platform you will have to translate this example into that platform’s workflow syntax.
Adding continuous integration is as easy as creating the .github\workflows folder at the base of the repository and then adding the workflow YAML file, which I named dotnet.yml to that folder. Here are the contents of that file:
1
2
3
4
5
6
7
8
9
10
11
12
13
14
15
16
17
18
19
20
21
22
23
24
25
26
27
28
name: Dotnet CI

on:
  workflow_dispatch:
  push:
    branches: [ main ]

jobs:
  build:
    runs-on: ubuntu-20.04

    steps:
    - name: Checkout main
      uses: actions/checkout@v3

    - name: Setup .NET
      uses: actions/setup-dotnet@v2
      with:
        dotnet-version: 6.0.301

    - name: Restore dependencies
      run: dotnet restore

    - name: Build
      run: dotnet build --no-restore

    - name: Test
      run: dotnet test --verbosity normal
Now let’s breakdown each step.
name: Dotnet CI
on:
  workflow_dispatch:
  push:
    branches: [ main ]
The name keyword allows you to name the workflow - workflows will be grouped by name under the projects Action tab. The on keyword allows you to specify the conditions for which this workflow executes - here I only execute the workflow when I push to the main branch.
jobs:
  build:
    runs-on: ubuntu-20.04
The next block defines the sequence of jobs to execute when the workflow conditions are met. In this workflow I have only one job named build (define additional jobs at the same indentation level as build). The runs-on keyword selects the type of machine to run the job on; other options include windows-2022 and macos-11. The full list of available options is here. NOTE: prefer ubuntu-20.04 to ubuntu-latest even though they are currently equivalent; ubuntu-latest will eventually point to ubuntu-22.04 so it is better to pin the dependency now.
    steps:
    - name: Checkout main
      uses: actions/checkout@v3
Each job consists of several steps; each step includes an optional name and then an action. The first step uses a Github Action to check out the main branch. There are several official Github actions and also over 14,000 user contributed actions available through the Github Marketplace. I tend to stick to the official actions since there are potentially some security concerns when using them. Also notice the @v3 appended to the end of the actions/checkout action - this pins the version of the action.
    - name: Setup .NET
      uses: actions/setup-dotnet@v2
      with:
        dotnet-version: 6.0.301
The next step users another official action to install .NET 6. This action is actually redundant since the ubuntu-20.04 runner actually comes pre-installed with lots of useful software including .NET 6. However, I chose to add this step since this was an explicit dependency that the build relies upon. I can’t be sure that Github will always include it with the runner, so I want to explicitly install it.
    - name: Restore dependencies
      run: dotnet restore

    - name: Build
      run: dotnet build --no-restore

    - name: Test
      run: dotnet test --verbosity normal
The final three steps restore the project’s dependencies, build, and test the project.
Visualizing the workflow
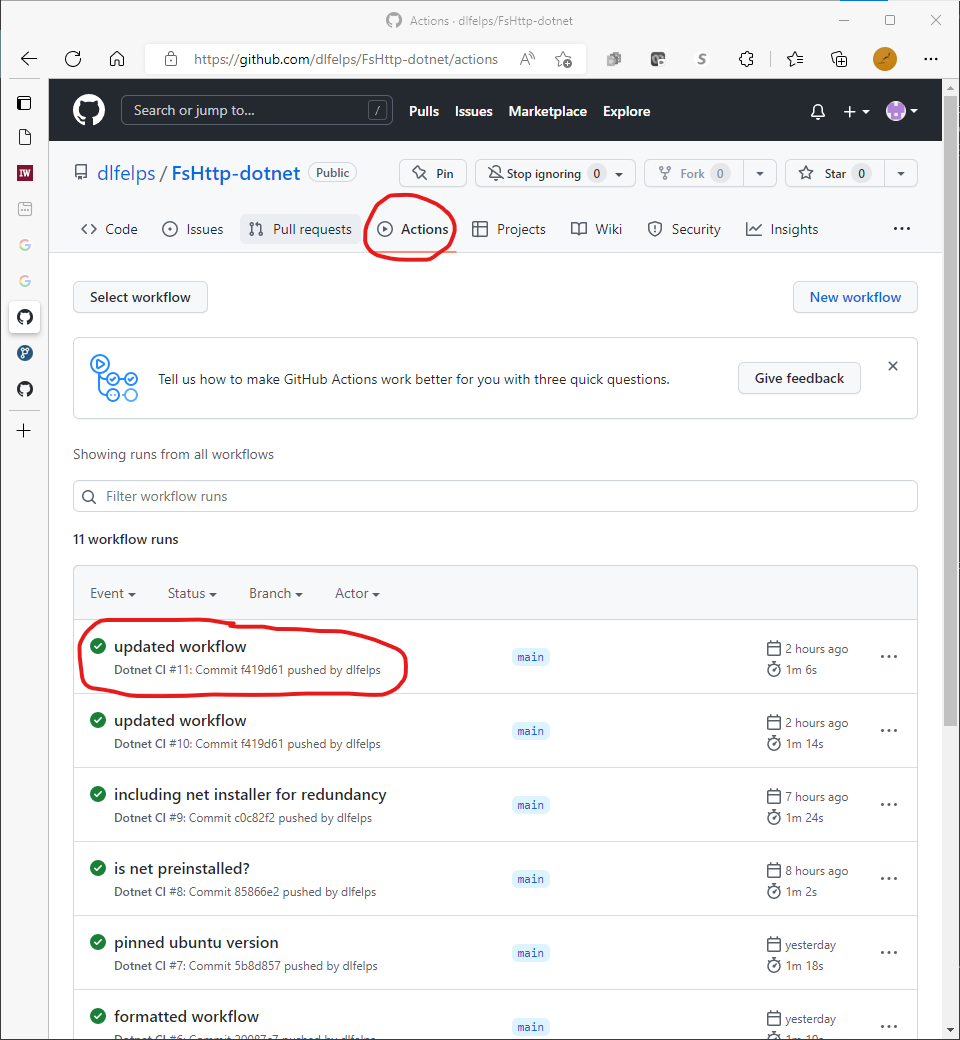
If you push this workflow file to the repo’s main branch it will execute for the first time. You can watch its progress by clicking on the Actions button from the repository’s main page. Then click on the most recent run, which will have the same name as the message of the most recent commit.

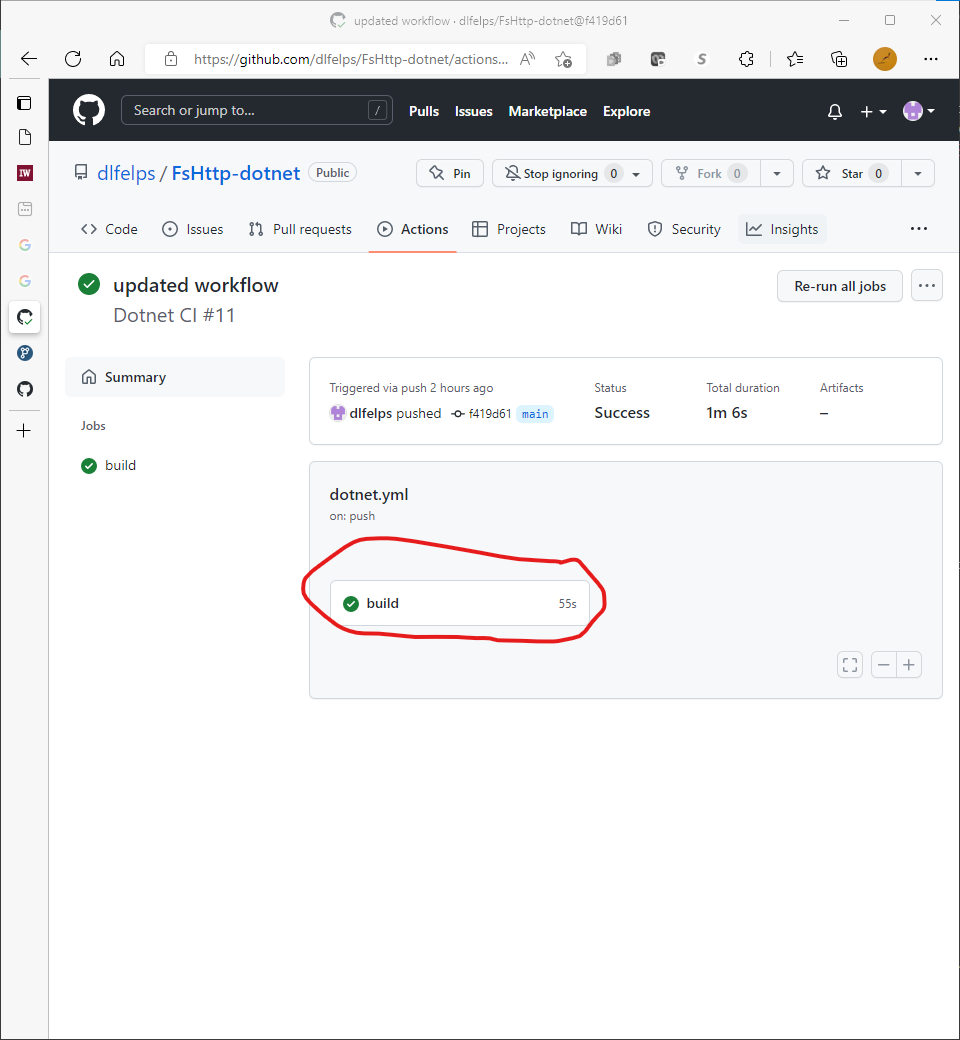
Then you can visualize the jobs contained within the workflow (there was only a single job named build in dotnet.yml). Clicking the build box will provide details of each step.

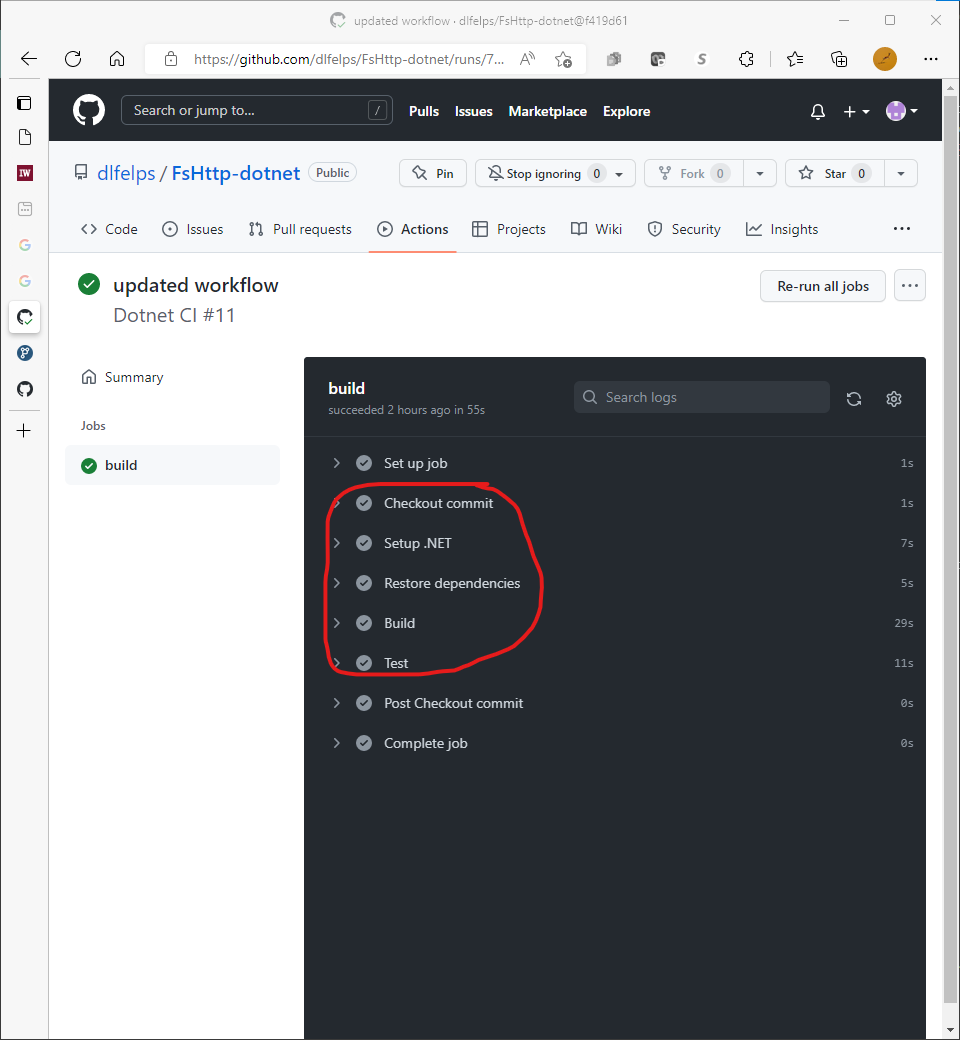
Here we see the names given to each of the steps along with some automatic setup and teardown steps.

Results
In the previous post we defined the following criteria for reproducible software:
- Build from any platform with the help of one pre-installed dependency
- Satisfy #1 in a standard and lightweight way across codebases
Did we satisfy them? Adding a Github workflow is certainly lightweight and repeatable since it will work for most .NET projects with little modification. But we didn’t explicity verify the first criteria since we only tested from Ubuntu. If you want to explicitly test additional platforms then I would recommend defining additional jobs that build in different environments:
jobs:
  build-linux:
    runs-on: ubuntu-20.04
    # steps...

  build-windows:
    runs-on: windows-2022
    # steps...

  build-macos:
    runs-on: macos-11
    # steps...
But since I assume that .NET 6 is installed on the host platform I don’t really need to test the other operating systems - if it compiles on one platform it will compile on the others because .NET compiles to Common Intermediate Language. The runtimes for each platform differ, but that is an isolated component that I don’t feel the need to verify. I think this is a big win for Microsoft and one of the reasons that I ❤️ .NET!
Approach #2 (Not .NET variant)
How difficult is it to translate Approach #1 into another language? I was able to convert a popular Golang repo in about 5 minutes. You will notice the similarities in the workflow; the full repo is here.
1
2
3
4
5
6
7
8
9
10
11
12
13
14
15
16
17
18
19
20
21
22
23
24
25
26
27
28
29
30
31
32
33
name: Go CI

on:
  workflow_dispatch:
  push:
    branches: [ main ]

jobs:
  build-linux:
    runs-on: ubuntu-20.04

    steps:
    - name: Checkout commit
      uses: actions/checkout@v3

    - name: Setup Go
      uses: actions/setup-go@v3
      with:
        go-version: 1.18

    - name: Build
      run: go build

    - name: Test
      run: go test .

  build-macos:
    runs-on: macos-11
    # steps...

  build-windows:
    runs-on: windows-2022
    # steps...
Results
This variant also meets the necessary criteria with one gotcha - since Golang compiles directly to machine code you need to add additional build jobs to test other platforms. Definitely still doable since Github also includes Golang in its machine images.
Approach #3 (Docker variant)
Basic knowledge of Docker required to follow this tutorial.
I know a lot of developers that really love Docker and they use it for everything. I use Docker to deploy services, but not for my development environment. It tends to add an extra step that I don’t really want while I am coding. But I also don’t tend to work on multiple projects simultaneously (each using a different version of something). Still, its simple enough to integrate Docker into the continuous integration workflow. If I was required to build a Docker image for a project then this is probably how I would do it (rather than building it locally). Here is the full repo and here are the contents of its workflow YAML:
1
2
3
4
5
6
7
8
9
10
11
12
13
14
15
16
17
name: Docker Image CI

on:
  push:
    branches: [ main ]

jobs:

  build:
    runs-on: ubuntu-latest

    steps:
    - name: Checkout commit
      uses: actions/checkout@v3

    - name: Build the Docker image
      run: docker build . --file Dockerfile --tag fshttp:$(date +%s)
The workflow only includes two steps - one to checkout the main branch and another to build the Dockerfile. The remaining steps are now inside the Dockerfile:
1
2
3
4
5
6
7
FROM mcr.microsoft.com/dotnet/sdk:6.0
WORKDIR /app

COPY . ./
RUN dotnet restore
RUN dotnet build --no-restore
RUN dotnet test --verbosity normal
The Dockerfile uses the standard .NET 6 baseimage provided by Microsoft, copies the new commit into the /app folder, and then restore/build/test.
Results
This variant is still lightweight, but we must look closely to see if it is truly cross-platform. We have changed our dependency assumption from .NET to Docker - any platform that can run Docker can build this code. If this is a .NET project then any code that successfully compiles to the Common Intermediate Language and passes the test suite will work on any platform (.NET for the win)! But what if its a Golang project? In that case we would need a separate job and Dockerfile for each platform. But there is no such thing as a macOS Docker image! In conclusion, Approach #3 meets the reproducibility criteria for all .NET projects, but not all projects.
Approach #4 (NUKE variant)
Update 7/17/2022 - A reader suggested I also compare the NUKE build system.
The NUKE build system has a unique way of creating continuous integration pipelines - unlike the previous three approaches, developers don’t manually create the YAML file. Instead they use the NUKE build tool to create a seperate .NET project and then specify the build process using NUKE’s extensive library. Running this project builds the primary solution and also generates any required artifacts (e.g. GitHub Actions YAML file). This makes NUKE’s build process sound complicated, but from a user’s perspective it is dead simple - they launch a single bootstrap script.
I appreciate this build strategy because it isolates the custom part of the build process to the build project and uses a standard bootstrap script across projects. Here are the contents of Build.cs from the build project:
1
2
3
4
5
6
7
8
9
10
11
12
13
14
15
16
17
18
19
20
21
22
23
24
25
26
27
28
29
30
31
32
33
34
35
36
37
38
[GitHubActions(
    "continuous",
    GitHubActionsImage.UbuntuLatest,
    OnPushBranches = new[] {"main"},
    InvokedTargets = new[] { nameof(Test) })]
class Build : NukeBuild
{

    [Solution] readonly Solution Solution;

    public static int Main () => Execute<Build>(x => x.Test);

    [Parameter("Configuration to build - Default is 'Debug' (local) or 'Release' (server)")]
    readonly Configuration Configuration = IsLocalBuild ? Configuration.Debug : Configuration.Release;

    Target Restore => _ => _
        .Executes(() =>
        {
          DotNetRestore(_ => _
            .SetProjectFile(Solution));
        });

    Target Compile => _ => _
        .DependsOn(Restore)
        .Executes(() =>
        {
          DotNetBuild(_ => _
            .SetProjectFile(Solution)
            .EnableNoRestore());
        });

    Target Test => _ => _
      .DependsOn(Compile)
      .Executes(() =>
      {
        DotNetTest();
      });
}
The first thing to notice is that this is proper C# code - not YAML. Starting from the top, the GitHubActions attribute before the Build class specifies which continuous integration platform YAML1 NUKE should create as part of the build process. Then - like the previous approaches - we define seperate targets for Restore, Compile, and Test. But unlike previous approaches these targets are not strings; instead they are symbols that can be type checked and debugged. Targets can be further refined using NUKE’s Fluent API, but I kept things pretty simple here. When the project runs a valid GitHubActions YAML is created:
1
2
3
4
5
6
7
8
9
10
11
12
13
14
15
16
17
18
19
20
21
22
name: continuous

on:
  push:
    branches:
      - main

jobs:
  ubuntu-latest:
    name: ubuntu-latest
    runs-on: ubuntu-latest
    steps:
      - uses: actions/checkout@v2
      - name: Cache .nuke/temp, ~/.nuget/packages
        uses: actions/cache@v2
        with:
          path: |
            .nuke/temp
            ~/.nuget/packages
          key: $-$
      - name: Run './build.cmd Test'
        run: ./build.cmd Test
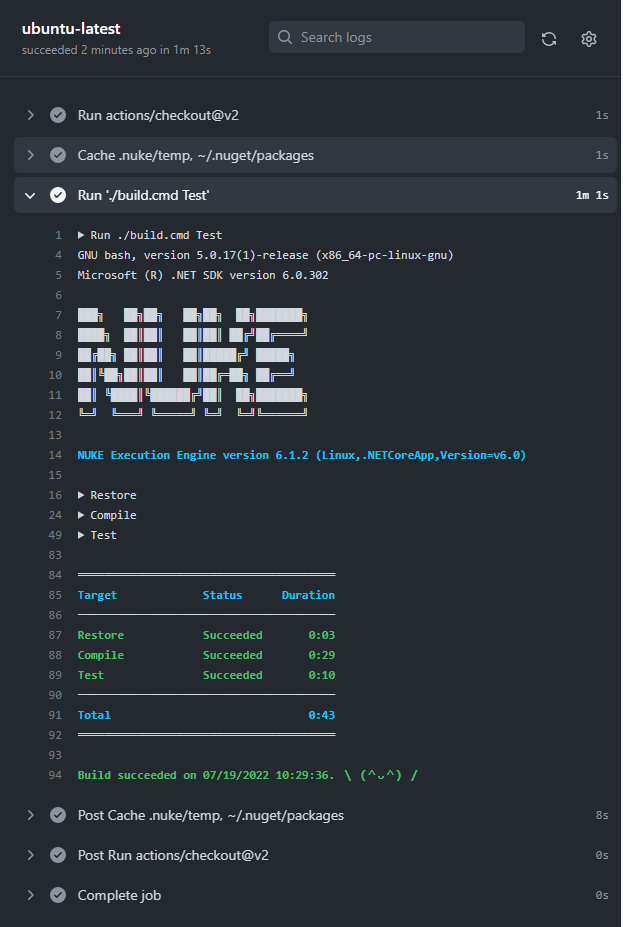
It is a simple YAML that checks out the code and launches the build script. If we push these updates to Github (e.g. FsHTTP-nuke) then the GitHub Actions will automatically test the build:

Results
NUKE was able to restore our original definition of reproducibility since it does not assume that .NET (or Docker) is installed:
- Build from a clean environment on any platform
- Satisfy #1 in a standard, lightweight, repeatable way across codebases
NUKE’s approach is slightly more involved than the creating the YAML file directly, but for a little more work you get a build specification that can be type checked and debugged that is compatible with almost any continuous integration platform. And unlike CAKE/FAKE, NUKE has a very gradual learning curve - you can get started easily and master more over time. Sadly, NUKE is only for .NET projects so if you are using another language you will have to try Approach #2 or #3.
Conclusion
You may choose whichever approach fits best within your current development workflow. My recommendations are as follows:
- If this is your first attempt at creating a reproducible build then follow Approach #1
- If your project is NOT a .NET project then follow Approach #2
- Otherwise follow Approach #4
Finally, thanks for reading this series on continuously reproducible code and I hope I have helped you develop a more continuously reproducible mindset! As always, your feedback is appreciated!
Footnotes
-
NUKE supports many popular CI/CD platforms out of the box (i.e. AppVeyor, Azure Pipelines, Bitbucket, GitHub Actions, GitLab, Jenkins, Space Automation, and TeamCity). ↩
